 Making Sausages Making Sausages
A novice's first attempt
I bought a meat grinder a couple of months ago with the aim of grinding my own hamburger, and making my own sausages. At least, I reasoned, I would know exactly what had gone into them.
I looked around for meat grinders on the Web and finally settled on a Krups “Butcher Shop” grinder. If you’re familiar with eBay you might want to look for this item there, as you’ll probably save a lot of bucks (I generally find that one can find things on eBay for about 25% less than online stores like Amazon.com.)
Eating your own ground beef is as different from store-bought as top-notch fresh pasta is to dépanneur Catelli, but that’s for another article.
 I was on a quest to make sausage. I was on a quest to make sausage.
The first thing I did was look around for good books on the subject. I settled on Bruce Aidell’s “Complete Sausage Book : Recipes from America's Premium Sausage Maker, “ but also ordered “Making Great Sausage: 30 Savory Links from Around the World Plus Dozens of Delicious Sausage Dishes”
by Chris Kobler (which I haven’t received yet.)
Aidells is America’s recognised expert on sausages (according to Ruth Reichl) so I felt this would be a good choice. It was, but the section dealing with actually making the sausages only occupies two pages! The rest was recipes, which I suppose is important too, but I needed to be comforted that the actual process of making sausages was easy. Like, maybe a 20-page manual (which this will hopefully end up being.)
Aidells stresses that you don’t need a meat grinder to make sausages, and I suppose you could use an extremely efficient food processor, but I really don’t think so. And all this nonsense, which I read on the Web in the course of my research, of squeezing sausage meat into the casings with a pastry bag—well, if you have a spare four hours to make eight links, I suppose that might work. But . . . let me just quickly dispel these facile workarounds. 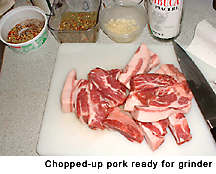 You need a meat grinder, with a sausage stuffer attachment. Trust me. Either that, or a Kitchenaid mixer (in the middle hundreds of dollars) and a grinder attachment. You need a meat grinder, with a sausage stuffer attachment. Trust me. Either that, or a Kitchenaid mixer (in the middle hundreds of dollars) and a grinder attachment.
I can’t vouch for the “ease-of-use” of a hand-crank meat grinder—definitely a low-cost option—but they’ve been used for centuries. (So have charcoal braziers, but you don’t cook your spaghetti sauce on one.)
Just get an electric grinder. Mine passes the test—barely. If you want to make large amounts of sausage, this is not the grinder for you.
The next step was finding out about those elusive things that you stuff sausage mixtures into. It’s that stuff that gives a good wienerwurst a snap when you bite into it, and it’s called a casing.
 I found out that there are many kinds of casings, usually each for different types of sausages. One thing that one has to get past in a hurry is that the organic casings are mostly made from the linings of ruminants’ intestines, something most of us don’t think about as we munch on a link of tasty Debreziner. (There are artificial casings, but they need not concern us here.) I found out that there are many kinds of casings, usually each for different types of sausages. One thing that one has to get past in a hurry is that the organic casings are mostly made from the linings of ruminants’ intestines, something most of us don’t think about as we munch on a link of tasty Debreziner. (There are artificial casings, but they need not concern us here.)
I wanted to know what kind of casings are used for sausages like Toulouse, country-style, or Italian-style sausages. I wasn’t particularly interested in knowing how to make hot dogs (apparently a quite difficult process,) which are basically ready to eat out of the package, but rather how to make the uncooked style of sausages, which have to be refrigerated or frozen promptly.
Through my friend Barry Lazar, I learned that casings were available at a variety of butchers about town, although they aren’t generally an item that’s for sale; the butchers use them themselves to make their own sausages.
I ended up at a place called Jos & Basile, and purchased “enough hog casings for 2 kg. of sausages, “ which worked out to about $5.00. I had no idea how many feet of casings that was, or what to do with them. “If you don’t use them,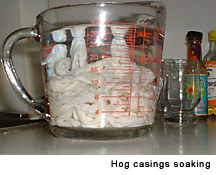 “ said the butcher, “pack them in salt in your refrigerator.” They looked like white worms. “ said the butcher, “pack them in salt in your refrigerator.” They looked like white worms.
I brought them home and pondered long and hard about actually doing it. “It’s somewhere between pickling and baking bread,” said one source. The horror! Pickling is a drag and baking bread is a slag. It’s at the same level of baking your loved one’s birthday cake from scratch: you have to love this stuff, or be a masochist. I’m somewhere in between.
I learned from Barry that there are other kinds of casings. He particularly recommended lamb casings, which I later learned are the most delicate and of the smallest circumference. I bought those too, but will detail their gestation in a later report.
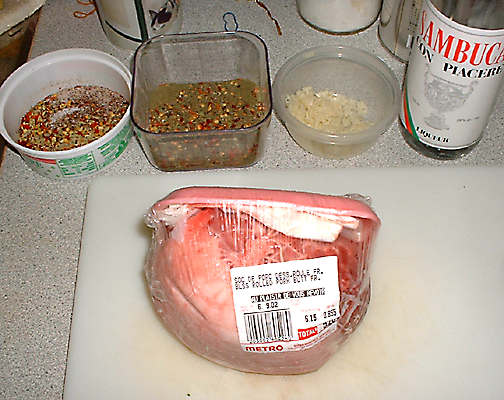
The day came for grinding. I decided on a recipe from Aidell’s book: “Spicy Fresh Country Sausage.”
Spicy Fresh Country Sausage
3 lbs. pork butt
3/4 to 1 lb. pork back fat
1 tablespoon red pepper flakes
4 teaspoons kosher salt
2 teaspoons sugar
2 teaspoons coarsely ground black pepper
2 teaspoons dried sage
1 teaspoon dried thyme
1 teaspoon ground cayenne
1/2 cup water
Medium hog casings (optional)
Arriving at the store and finding that the pork butts weighed in at 2.5 pounds, I adjusted the other ingredients to match. One thing I found was that the pork butt had a hefty amount of fat on it--perhaps as much as 15%--so I questioned the additional back fat. (Still, don’t ever think you can make a lean sausage. They just don’t exist, unless you like those sorry chicken-apple things.)
In addition, the pork back fat that was available at my grocer (Metro) had the additional qualification of being salt-cured, which I wasn’t sure the recipe called for—but there was nothing else available. I wasn’t about to pop a bit of pork fat in my mouth to see how salty it was, so I just had to assume it was VERY salty. Unfortunately, one can’t imagine that a teaspoon of salty fat can have the eqivalent of two teaspoons of regular salt in it, as I was to find out.
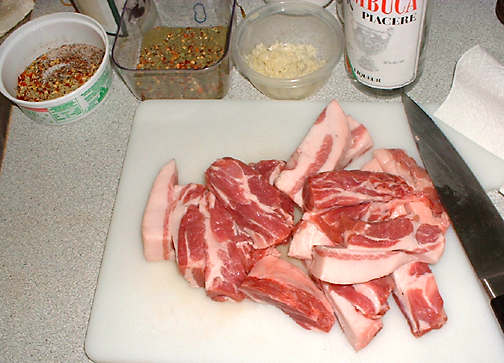
When I got home, the first thing I did was to put the pork in the freezer. I let it stay there for about an hour. The reason for this is to get it as cold as possible without freezing, because you’re going to be manipulating it for about 15 minutes at room temperature, and you don’t want the bacteria to multiply (after meat reaches room temperature, bacteria double every minute.) Also, the meat tends to go through the grinder more easily when it’s cold.
Then, I mixed the spices together in a bowl.
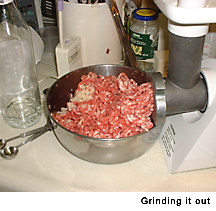
When the hour was up I cut the pork and fat into chunks that would fit in the meat grinder funnel.
Grinding meat is always fun. I love watching the transition from solid meat into wriggling worms.
After I was done with the grinding, I mixed in the spices with my hands, really well, and put the bowl of ground pork back in the refrigerator immediately.
I waited a day for the meat and spices to blend, and an hour before stuffing I got the meat back down to near-freezing.
I took the casings out of the refrigerator and followed the 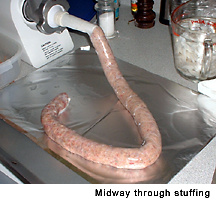 directions the book, Barry and the butcher had given me, with one complication: the casings were so tangled that it was like unravelling a knot of overdone vermicelli that’s ten feet long. directions the book, Barry and the butcher had given me, with one complication: the casings were so tangled that it was like unravelling a knot of overdone vermicelli that’s ten feet long.
Also, the stuff doesn’t smell so hot—if one could smell salt, that’s in there, but there’s also another, indescribable smell. You get used to it after a while.
Having untangled it, being forced to cut it in several places, I now had to flush it. This I almost did, literally. I attached one end of a length of casing to the tap and turned on the water. Mistake. I was so transfixed by watching this incredible thing fill with water like a John Holmes condom that I was not prepared when two-thirds of it immediately slipped into the drain. I have one of those Insinkerators which have jagged pieces of rubber in the drain opening, so dragging it back out was not an option: I had to cut it and deal with the remaining casing.
This time, I was careful to block off the drain opening with a sieve and do the flushing into a bowl. And I only put about six inches of water into the length of casing and manipulated it through the casing. They don’t tell you these things in the book.
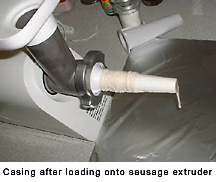
When I was done with that, I put the casings into warm water and prepared the grinder. Of course, I didn’t want to re-grind the meat, so I left the propeller-like blade and plate out, and just attached the sausage-stuffer tube. You people with Kitchenaid-type grinders will have to figure this step out for yourselves.
Don’t try to stuff sausage by yourself the first time (or even, ever.) One person needs to feed the meat into the grinder and the other person needs to guide the stuff into the casings.
 I enlisted my Significant to help. The casings were by now floating like some well-fed tapeworms in the measuring cup, and I just grabbed one length, which happened to be about three feet long. I carefully opened one end of the casing and slid it onto the stuffer tube. The innuendo factor is huge here, but I won’t mention it if you don’t. I enlisted my Significant to help. The casings were by now floating like some well-fed tapeworms in the measuring cup, and I just grabbed one length, which happened to be about three feet long. I carefully opened one end of the casing and slid it onto the stuffer tube. The innuendo factor is huge here, but I won’t mention it if you don’t.
I carefully pushed it onto the tube until, like an accordion, there was only about a 3-inch length left hanging from the end of the tube.
Now it was time to stuff. My Significant dutifully shoved the ground meat into the grinder mouth and turned it on. Pretty soon, it was at the mouth of the stuffer tube, and she turned it off. Making sure there was no air bubble, I tied off the casing. Then, we proceeded to stuff.
Casing is amazing. Nature designed it incredibly well. There were no holes. There were no tears. It was consistently exactly the same diameter throughout its length. A condom should be so thin and so strong!
It was fairly easy work making sure the right amount of meat went into the stuffing. Too much, and it might burst later when you link it; too little and you’d get a limp sausage.
Most of the work was done by my Significant, as a stuffed feeder tube only seemed to yield about three inches of stuffing. Wouldn’t want to do 20 pounds of this stuff—you’d be there all day.
 But amazingly, everything went without a hitch! No breaks, no tears, no disasters. But amazingly, everything went without a hitch! No breaks, no tears, no disasters.
When the sausage meat was gone, I tied off the casing and put the one long sausage back into the fridge to cool down.
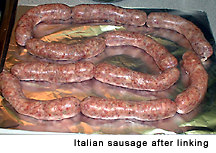
Then, when it was time to make the links, out it came again. You make links by pinching off a section of the link about 5-8 inches into the sausage. Then you pinch off another, equal section. Then you take section No. 2 and twirl it so that it seals both ends. Then you make two more pinches and do the same thing till it’s done. Then it goes back in the refrigerator.
I haven’t mentioned it, but at the same time, I also made New York San Gennaro-style Hot Italian sausage. Here’s the recipe for that:
New York-Style Spicy Hot Italian Sausage
3 lbs. pork butt
3/4 to 1 lb. pork back fat
2 tablespoons anise-based liqueur, like Sambucca
2 tablespoons anise or fennel seeds
2 tablespoons minced garlic
2 tablespoons red pepper flakes
4 teaspoons kosher salt
2 teaspoons sugar
2 teaspoons coarsely ground black pepper
1 teaspoon ground cayenne
1/4 cup water, as needed
Medium hog casings (optional)
After going to the store and buying all the ingredients, I had forgotten cayenne, thinking I had some. I didn’t, so I substituted a few drops of Mo Hotta Mo Betta Red Savina Habañero sauce. This comes highly recommended!
And that’s about it. I left the sausages in the refrigerator, uncovered as recommended by the book, and fried them up (takes about 10-15 minutes; don’t add oil or fat) and, needless to say, they were the best sausages I have ever eaten in my whole life.
|
|